MongoDB is the very first choice when working with database using Nodejs but we can connect to other databases also. Here we will be looking to connect MySql using Nodejs app.
Connect MySql Using Nodejs App
Let’s start by creating a new nodejs project by following these simple steps
Using NPM
Step 1. Create a working project directory where we will create the Nodejs project.
$ mkdir connect_mysql_nodejs

$ cd connect_mysql_nodejs
Step 2. Once inside the project folder lets initiate the npm command to create the project template and setup the package.json file.
$ npm init

// filing up the procedure
name: (connect_mysql_nodejs) //default folder name
version: (1.0.0) 0.0.1 // your version number
description: Tutorial on Nodejs With Mysql Queries
entry point: (index.js) app.js // your main file
test command:
git repository: // git project if any
keywords: nodejs mysql
author: developersjournal
license: (ISC)
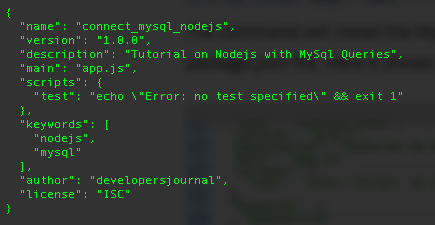
The above commands will create the package.json file for us. The final file looks like this:

Step 3. Now we need to install the MySql dependency in the project so that we can start using it.
$ npm install mysql --save
The --save parameter will save the contents of the MySql dependencies file locally on the project folder under node_modules.
Sql Database Connection
Step 4. Import the MySql package in the app.js file using the require method and also start the mysql localhost server where we will be establishing the connection.
NOTE: We will be working on app.js file as this is the file which we have declared while creating the project.
var mysql = require('mysql');
// Creating the connection
var con = mysql.createConnection({
host: "localhost", //Hostname where MySql is running
user: "username", //Username to connect to MySql
password: "password" //Password for MySql User
});
con.connect(function(err) {
if (err) throw err;
console.log("Connected!"); // message
});
Now to run the app.js file simply write the command
$ node app.js

Connected! //Successfully Connected to MySql
Database And Table Creation
Now we will be having a look at how to create the database as well a table in that particular Database. But first, we will create the database.
var mysql = require('mysql');

var con = mysql.createConnection({
host: "localhost",
user: "yourusername",
password: "yourpassword"
});

con.connect(function(err) {
if (err) throw err;
console.log("Connected!");
con.query("CREATE DATABASE mydb", function (err, result) {
if (err) throw err;
console.log("Database created");
});
});
This will connect database as well as creates the database of name mydb. So run the file as we run earlier i.e $ node app.js.
Creating Table
Creating table is as similar as it was creating a database, but all we need to do is to give the database name in the ‘con’ variable. let’s see:
var mysql = require('mysql');
var con = mysql.createConnection({
host: "localhost",
user: "yourusername",
password: "yourpassword",
database: "mydb" // Declare the database name
});
con.connect(function(err) {
if (err) throw err;
console.log("Connected!");
// Create table Query
var sql = "CREATE TABLE customers (id VARCHAR(12), name VARCHAR(30))";
con.query(sql, function (err, result) {
if (err) throw err;
console.log("Table created");
});
});
Inserting And Viewing Data
Let us see the further procedure for inserting data and viewing in the terminal. So first we have to insert data into the table.
var mysql = require('mysql');
var con = mysql.createConnection({
host: "localhost",
user: "root",
password: "",
database: "mydb"
});
con.connect(function(err) {
if (err) throw err;
console.log("Connected!");
var sql = "INSERT INTO customers (id, name) VALUES (0001, 'Mr. Developer')";
con.query(sql, function (err, result) {
if (err) throw err;
console.log("1 record inserted");
});
});
After the data is inserted successfully, now we can display the data of table on the terminal. So just add the SELECT Query to get the data.
con.connect(function(err) {
if (err) throw err;
console.log("Connected!");
con.query("SELECT * FROM customers", function (err, result) {
if (err) throw err;
console.log(result);
});
});
And the data which is displayed are in raw (json format).
$ node app.js

Connected!
[ RowDataPacket { id: '1', name: 'Mr. Developer' }]
Updating And Deleting Data
For Editing the table you just need to change the query. so first we will update the table
var mysql = require('mysql');

var con = mysql.createConnection({
host: "localhost",
user: "root",
password: "",
database: "mydb"
});
con.connect(function(err) {
if (err) throw err;
var sql = "UPDATE customers SET name = 'Mr. Journal' WHERE id = 0001";
con.query(sql, function (err, result) {
if (err) throw err;
console.log(result.affectedRows + " record(s) updated"); // Shows the number of updated table
});
});
And at last for deleting the record or table from the database and that is similar to all above queries.
con.connect(function(err) {
if (err) throw err;
var sql = "DELETE FROM customers WHERE id = 0001";
con.query(sql, function (err, result) {
if (err) throw err;
console.log("Number of records deleted: " + result.affectedRows);
});
});
Conclusion


I like this approach, but ORM like Sequelize can also be used