

In this journal, we will be creating a Web API using ASP.NET and MySql. All thanks to the Entity Framework and ASP.NET, creating Web API that interact with the database with C# has become quite easy.
If you are wondering what exactly is a Web API, well Web API is basically a MVC application but without View(s). If you know how to create website with ASP.NET using MVC, then you can apply the skills directly to API building.
Dotnet version of object-relational mapper (ORM) is Entity Framework. This framework provides a nice abstraction layer to interact with relational databases. If you are using Entity Framework, then you do not have worry about writing SQL queries. Using C# coding standards, database Tables become classes and methods in the class define the SQL queries.
Using the power of .NET framework and tools provided, a web API can be created which interact with the database very quickly. The .NET framework is available only on Windows platform where as .NET Core framework is available for cross-platform development and thus can run on any OS.

Read More: How to create reusable packages for .NET Core
Let’s get started.
We will be using the MySql as a backend database and Sakila that comes with the MySql Community edition installation. However, if you do not have the specified database, then you can download it from here [https://dev.mysql.com/doc/sakila/en/sakila-installation.html]
Also another required piece is the latest version of .NET Core and Visual Studio installed on your development machine.
#1 Create a Web API project
If you are using Visual Studio, then it comes with predefined template types. Choose .NET Core Web application and then Web API from the template types. However, you can also use the
dotnet new: Specifies that we are creating a newdotnet project.webapi : Specifies the type of the project. For the list of the project types that can becreated you can run the following command and have a nice peek “dotnet new -h“.- -o MyProject: Specifies the output folder name “MyProject”.
Basically this defines the project name.
#2 Install Dependencies
To work with the database in our .NET Core project, we need two packages to be installed, MySql.Data.EntityFrameworkCore and Microsoft.EntityFrameworkCore.Tools. From the command line get into the project directory and then execute the following command in specified sequence.
cd MyProject
dotnet add package MySql.Data.EntityFrameworkCore
dotnet add package Microsoft.EntityFrameworkCore.Tools
dotnet restore
#3 Import the model from Sakila database
There are some very useful command-line tools provided by the EntityFrameworkCore.Tools package. With the use of a single line of command, we can create the models and DbContext from the choosen database.
dotnet ef dbcontext scaffold "Server=localhost;Port=3306;Database=sakila;Uid=dbuser;Pwd=dbpwd;" MySql.Data.EntityFrameworkCore -o Models
#4 Remove OnConfiguring Method in sakilaContext.cs
Open the file sakilaContext.cs which is a newly created DbContext file in the Models folder. There you will find the warning:
To protect potentially sensitive information in your connection string, you should move it out of source code. See http://go.microsoft.com/fwlink/?LinkId=723263 for guidance on storing connection strings.
Go ahead and remove the OnConfiguring() method from the file.
#5 Add the connection string in appsettings.json
Just above Logging, provide the “ConnectionStrings” as below.
{
     "ConnectionStrings": {
         "SakilaDatabase": "Server=localhost;Port=3306;Database=sakila;Uid=myusername;Pwd=mypwd;"
     },
     "Logging": {
         "IncludeScopes": false,

...
#6 Add DbContext to ConfigureServices()
Open the Startup.cs file, there we need to configure the DbContext by adding sakilaContext to the ConfigureServices() method just above services.AddMvc().
services.AddDbContext(options => options.UseMySQL(Configuration.GetConnectionString("SakilaDatabase")));
This will inject sakilaContext into the controller. This is much better than using OnConfiguring method.
If you encounter any red line in the code, just right click and press refactor or Quick Fix to add the necessary package import statement.

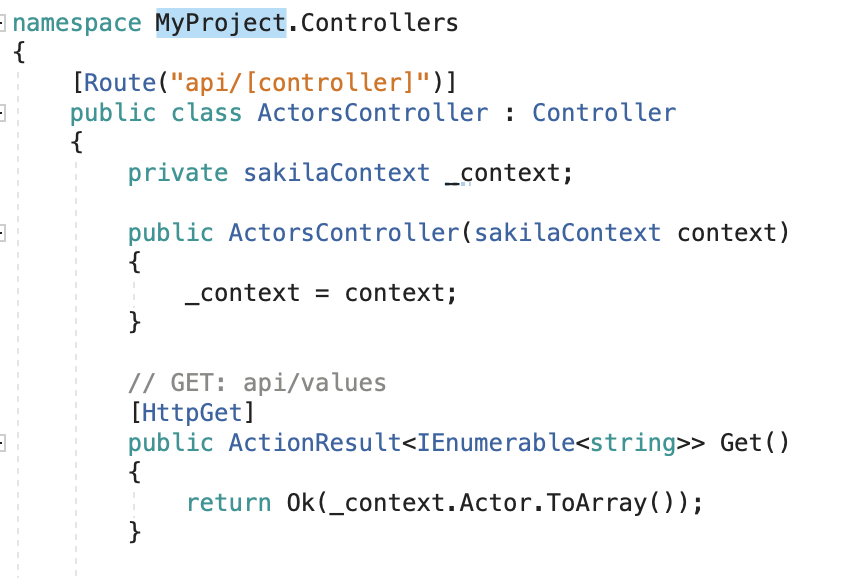
#7 Create a controller
- Right click the controllers folder and add new Web API Controller. It already has a scaffold code.
- Create private property _context.
- Add constructor with sakilaContext as an argument.
- Convert Actor to array in the return statement with Ok().
#8 Let’s Run and Test
Run the project. The browser will show you the API from ValuesController. You can change the path to /actors.